Update: November 9, 2014. A few people asked me how to handle serving web fonts using CloudFront. I created a new post here that covers a few options.
Moving your static assets (images, css, javascripts, etc.) to a Content Delivery Network is a quick, easy, and impactful win for the performance of your Rails application. CDNs are designed to distribute your content to multiple geographic locations and to serve it up to your users in the most optimal way possible. Using a CDN also lets you reduce the number of requests your web servers need to handle. This is especially important when you are hosted on platform like Heroku.
You don’t want your precious (and expensive) dynos spending their time serving up images.
Why CloudFront?
There are numerous CDN services available but I find CloudFront is a simple and inexpensive option that can suit the needs of many sites and applications.
Can’t I just use S3 to host my static assets? While it is certainly possible, this is not ideal. S3 was really designed and optimized for storage and not for distribution. You can use S3 as an origin for your CloudFront distribution but you should avoid serving your assets directly from S3.
Setting up a CloudFront Distribution
I am going to assume you already have signed up as an AWS user and have access to the AWS Management Console; if not, sign up here. The first thing we need to do is create a new distribution for our site.
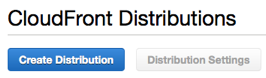
Navigate to the CloudFront service section of the console.
Click the Create Distribution button.
Choose Web for the delivery method and click Get Started.

You will now see a fairly long form that you need to fill out. It can look a little intimidating but, luckily, the defaults will be sufficient for many applications. Amazon does provide some nice, inline help information if you do want to spend the time to look over every option. You do need to specify the following:
-
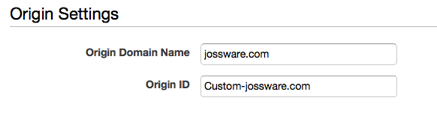
Origin Domain Name
An origin specifies where CloudFront is going to retrieve files from if it does not already have them in it’s cache. You have two options here: using your own site as the distribution or using an S3 bucket. For this post, I am going to focus on the simpler option of using your domain as the origin. So, enter the domain name of your site for Origin Domain Name.
-
Origin ID
This will be pre-populated for you and you can leave it alone it if you wish. CloudFront distributions do support multiple origins and the ID is just a description so that you can tell them apart.
By default, CloudFront distributions have a domain at *.cloudfront.net. It is possible to use your own domain name (assets.yourdomain.com, for example) if you wish. If so, add your desired domain to the Alternate Domain Names (CNAMES) field. At your DNS provider, you will need to configure your domain as a CNAME that points to the CloudFront distribution domain name that you will receive after the next step.

Click Create Distribution.

It will take several minutes for AWS to create your distribution. You can monitor the progress in the management console but this is a good time to grab a cup of coffee.
Once it is done, grab the domain name for your distribution (you will find it in the management console) so you can test that it is working properly.
Let’s say your CloudFront distribution domain is d3nwzvnnqkgieg.cloudfront.net and that you have an image at
http://yourdomain.com/assets/sample.png
Just replace yourdomain.com with the CloudFront distribution domain. If you configured everything correctly, the same image should be available at
http://d3nwzvnnqkgieg.cloudfront.net/assets/sample.png
Configuring Rails to use CloudFront
At this point, you should have a working CloudFront distribution that uses your site as an origin. Now, we need to let Rails know about this so that it can properly generate asset urls using the CloudFront domain as the asset host.
Note: I am assuming you are using the Rails asset pipeline and its corresponding asset helpers to generate properly versioned asset paths. Rails adds a unique “fingerprint” to every file name when it compiles assets. If you don’t have fingerprinted assets, you will make your life harder as a CDN like CloudFront will continue to serve cached assets even if you have changed the contents of those assets on your origin. By generating unique, fingerprinted file names through the asset pipeline, you simply don’t have to worry about expiring the CloudFront caches.
This process is really simple in Rails. All you need to do is update your production environment configuration file (and any other environment configuration you might want to use CloudFront with) to use your CloudFront distribution domain as the asset host.
# config/environments/production.rb
config.action_controller.asset_host = "d3nwzvnnqkgieg.cloudfront.net"
Note: In the interest of building a twelve-factor style application, I actually prefer to use an ENV var to set the asset host. For example:
# config/environments/production.rb
config.action_controller.asset_host = ENV['CLOUDFRONT_ASSET_HOST']
When you deploy your application to production, Rails will generate full CloudFront urls for your assets. Let’s take a quick look back at our original example. In a Rails view, you might have:
<%= image_tag("sample.jpg", alt: "Sample Image" %>When Rails renders the view, it should output something like:
<img alt="Sample Image" src="http://d3nwzvnnqkgieg.cloudfront.net/assets/sample-0249fabde1c3a9dec561a00aa397b3ed.jpg">And, that’s all there is to it. Using a CDN like CloudFront is a no-brainer. It is simple, inexpensive, and can noticeably improve the performance of your site.